由于较新版本NDK编译FFmpeg源码资料较少,网上的教程大多都是NDK<=17的,自己也是经过漫长的调试才编译成功的,这里整理过来记录一下
本文参考的文章,大家需要的话可以去学习看一下
(1) Android NDK Build FFMPEG in 2021
https://stackoverflow.com/questions/68862476/android-ndk-build-ffmpeg-in-2021
(2) Android FFmpeg 编译和集成(十四)- PengJie
https://cloud.tencent.com/developer/article/1773965
如果你想在FFmpeg使用libx264,你可能还需要参考以下文章,因为ffmpeg默认是不带libx264的,只是加--enable-libx264是不行的,还需要编译相应的源码
(1) Android NDK编译libx264源码
(2) Android FFmpeg编译时导入libx264
环境准备
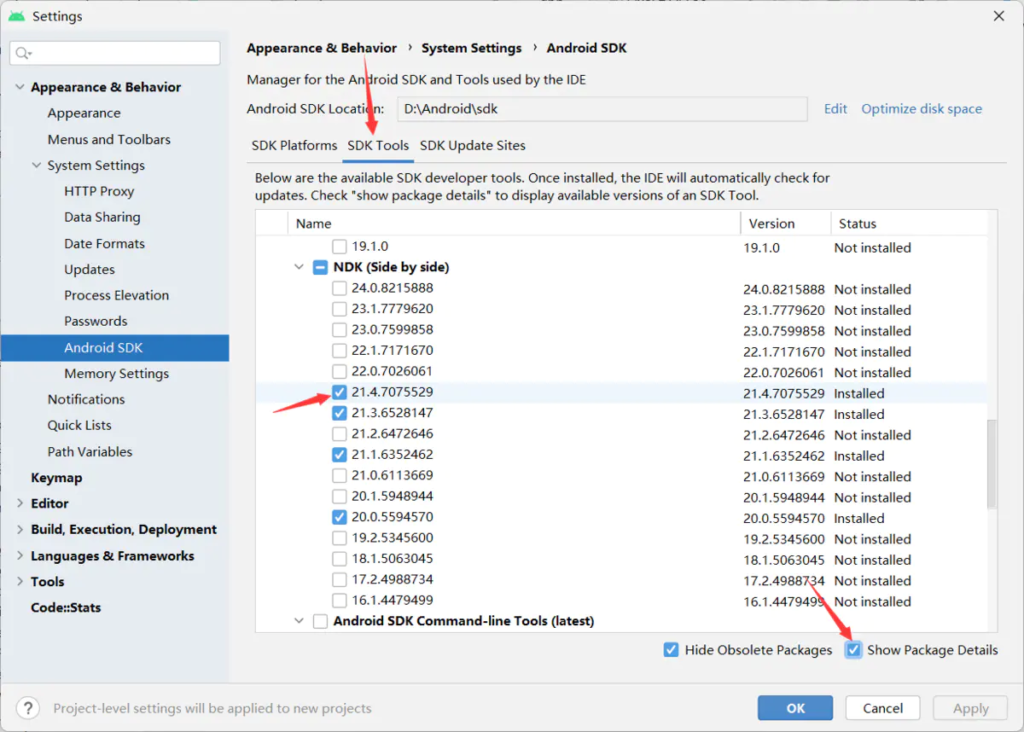
1.NDK版本21.4.7075529,请尽量在Android Studio里下载,因为windows,linux,macos的ndk是不一样的,所以尽量不要去百度下载,避免下错白弄很久(下载方式如下图)

NDK下载方法
2.FFmpeg官方下载地址(https://ffmpeg.org/download.html)
#官方源码克隆地址
git clone https://git.ffmpeg.org/ffmpeg.git
#github克隆地址
git clone https://github.com/FFmpeg/FFmpeg.git
1.编写编译脚本build.sh
脚本文件放在fmpeg源码的根目录,与configure文件在同一目录
#!/bin/bash
set -x

###########根据自己电脑环境进行修改,  确保CC,CXX文件存在################Start
#Compile android api level, if compile armv7a,change to eabi21
API=21
#arm64,armv7-a,i686,x86-64
ARCH=arm64
#armv8-a,armv7-a,i686,x86-64
CPU=armv8-a
#aarch64,armv7a, i686, x86_64
TOOL_CPU_NAME=aarch64

#NDK path
NDK=/root/Android/Sdk/ndk/21.4.7075529
#Compile output
OUTPUT=/home/qlx/ffmpeg_build/$CPU
#Toolchain path, make sure this file exists
TOOLCHAIN=$NDK/toolchains/llvm/prebuilt/linux-x86_64
#Sysroot, Default
SYSROOT=$TOOLCHAIN/sysroot
TOOL_PREFIX="$TOOLCHAIN/bin/$TOOL_CPU_NAME-linux-android"
#Clang C/C++ executable file
CC="$TOOL_PREFIX$API-clang"
CXX="$TOOL_PREFIX$API-clang++"
#Strip executable file path, use to reduce .so file size, if compile release .so file,
# can  remove  --disable-stripping attribute from below
STRIP="$TOOL_PREFIX-strip"
#If compile armv7,change to this
#STRIP="$TOOLCHAIN/bin/arm-linux-androideabi-strip"
#########################################################################End

#启用优化
OPTIMIZE_CFLAGS="-march=$CPU"
function build
{
  ./configure \
  --prefix=$OUTPUT \
  --target-os=android \
  --arch=$ARCH  \
  --cpu=$CPU \
  --disable-asm \
  --disable-stripping \
  --disable-programs \
  --disable-static \
  --disable-doc \
  --disable-ffplay \
  --disable-ffprobe \
  --disable-symver \
  --disable-ffmpeg \
  --enable-shared \
  --enable-cross-compile \
  --cc=$CC \
  --cxx=$CXX \
  --strip=$STRIP \
  --sysroot=$SYSROOT \
  --extra-cflags="-Os -fpic $OPTIMIZE_CFLAGS" \

  make clean all
  # 这里是定义用几个CPU编译
  make -j8
  make install
}
build
脚本文件中参数说明
| 变量名称 | 说明 |
|---|---|
| API | 构建的API版本,注意旧版本NDK是没有这个api版本数字的,你需要看你的$NDK/toolchains/llvm/prebuilt/linux-x86_64/bin下的clang文件是否存在21,22,23这样的数字,也就是aarch64-linux-android21-clang之类的文件 |
| ARCH | 构建的so文件类型(arm64, armv7a, i686, x86_64), 如若是armv7a,请将API改成eabi21,因为要与ndk的文件对应才能编译 |
| CPU | 构建目标平台的CPU类型(armv8-a,armv7-a,i686,x86-64) |
| TOOL_CPU_NAME | CPU名称,其实也要与NDK下的文件对应(aarch64,armv7a, i686, x86_64) |
| OUTPUT | .so库文件和头文件输出的路径 |
| NDK | 本地NDK目录的位置,注意,NDK是区分Linux,Windows,Mac的 |
| TOOLCHAIN | 构建工具的目录,这个位置通常是固定,注意结尾的linux-x86_64,在windows,linux,mac是不同的,需要自己看着路径去修改 |
| TOOL_PREFIX | 编译文件前缀,不需要理会,其实就是定位clang。clang++文件位置的前缀 |
| CC | (重要)编译C文件的工具位置,指clang |
| CXX | (重要)编译C++文件工具的位置,指clang++ |
| STRIP | strip文件的位置,用来减小so文件体积用的,ffmpeg默认开启,所以需要指定文件位置,如果是调试阶段,不需要去除符号,可以在配置中加入--disable-strapping |
2.执行脚本
#加入可执行权限
chmod +x build.sh
#执行脚本
./build.sh
执行完毕后,没报错的话去OUTPUT目录去找文件就好了
3.将编译好的so库文件导入项目中
打开OUTPUT路径下lib目录,将so文件复制到app目录下的libs目录
这里由于我是在模拟器测试的,所以只编译导入了x86的so文件,需要armv8的可以根据脚本文件给出的注释进行修改,然后再编译即可(注意事项:不要在app的build.gradle中加入jniLibs.srcDirs的这种方式让so库文件附加到apk中,这是java调用的方式,由于我们需要在C++代码中引用so文件和编写native代码,所以你需要用CMakeList的方式去引入,这里后面会提到)

导入so文件
4.修改CMakeList.txt配置引入头文件和so文件
将编译后OUTPUT路径的include里的.h头文件放置到cpp目录的ffmpeg中,然后修改CMakeList.txt配置
这是我的目录结构

文件树
这是我的CMakeList.txt文件的代码,你可以选取你需要的地方复制进去就好了,这部分不会有太大的变化
# For more information about using CMake with Android Studio, read the
# documentation: https://d.android.com/studio/projects/add-native-code.html

# Sets the minimum version of CMake required to build the native library.

cmake_minimum_required(VERSION 3.18.1)

# Declares and names the project.

project("surfacework")

#声明FFMPEG的头文件所在路径
set(CPP_DIR ${CMAKE_SOURCE_DIR})
set(FFMPEG_HEAD_PATH "${CPP_DIR}/ffmpeg")
get_filename_component(FFMPEG_LIB_PATH ${CPP_DIR}, PATH)
get_filename_component(FFMPEG_LIB_PATH ${FFMPEG_LIB_PATH}, PATH)
get_filename_component(FFMPEG_LIB_PATH ${FFMPEG_LIB_PATH}, PATH)
set(FFMPEG_LIB_PATH ${FFMPEG_LIB_PATH}/libs/${ANDROID_ABI})
include_directories(${FFMPEG_HEAD_PATH})
#输出环境信息
message("==========================FFMPEG Enviroment=================================")
message("FFMPEG_HEAD_PATH => ${FFMPEG_HEAD_PATH}")
message("FFMPEG_LIB_PATH => ${FFMPEG_LIB_PATH}")
#声明要导入的库
set(
        # List variable name
        ffmpeg_libs_names
        # Values in the list
        avformat avcodec avfilter avutil swresample swscale)
message("==========================FFMPEG Shared Library==============================")
#导入ffmpeg的so库
foreach (ffmpeg_lib_name ${ffmpeg_libs_names})
    add_library(
            ${ffmpeg_lib_name}
            SHARED
            IMPORTED)
    set_target_properties(
            ${ffmpeg_lib_name}
            PROPERTIES
            IMPORTED_LOCATION
            ${FFMPEG_LIB_PATH}/lib${ffmpeg_lib_name}.so)
    message("[import so file] => ${FFMPEG_LIB_PATH}/lib${ffmpeg_lib_name}.so")
endforeach ()


# Creates and names a library, sets it as either STATIC
# or SHARED, and provides the relative paths to its source code.
# You can define multiple libraries, and CMake builds them for you.
# Gradle automatically packages shared libraries with your APK.

add_library( # Sets the name of the library.
             surfacework

             # Sets the library as a shared library.
             SHARED

             # Provides a relative path to your source file(s).
             surfacework.cpp )

# Searches for a specified prebuilt library and stores the path as a
# variable. Because CMake includes system libraries in the search path by
# default, you only need to specify the name of the public NDK library
# you want to add. CMake verifies that the library exists before
# completing its build.

find_library( # Sets the name of the path variable.
              log-lib

              # Specifies the name of the NDK library that
              # you want CMake to locate.
              log )

# Specifies libraries CMake should link to your target library. You
# can link multiple libraries, such as libraries you define in this
# build script, prebuilt third-party libraries, or system libraries.

target_link_libraries( # Specifies the target library.
                       surfacework

                       # Links the target library to the log library
                       # included in the NDK.
                       ${log-lib}
                       ${ffmpeg_libs_names} )
CMakeList.txt关键修改部分
在最后的打印结果中,FFMPEG_HEAD_PATH 和 FFMPEG_LIB_PATH 变量需要分别指向.h头文件路径和.so文件的路径,也就是目录结构中的ffmpeg文件夹和libs文件夹
....................
#声明FFMPEG的头文件所在路径
message("==========================FFMPEG Enviroment=================================")
message("FFMPEG_HEAD_PATH => ${FFMPEG_HEAD_PATH}")
message("FFMPEG_LIB_PATH => ${FFMPEG_LIB_PATH}")
....................
声明要导入的so库,这里基本复制粘贴就好了,avformat avcodec avfilter avutil swresample swscale这些的按需要加上,但要注意顺序,因为有些so库文件要引入其它so库,在其它so文件没导入的时候就先导入,可能会报错
#声明要导入的库
set(
        # List variable name
        ffmpeg_libs_names
        # Values in the list
        avformat avcodec avfilter avutil swresample swscale)
message("==========================FFMPEG Shared Library==============================")
#导入ffmpeg的so库
foreach (ffmpeg_lib_name ${ffmpeg_libs_names})
    add_library(
            ${ffmpeg_lib_name}
            SHARED
            IMPORTED)
    set_target_properties(
            ${ffmpeg_lib_name}
            PROPERTIES
            IMPORTED_LOCATION
            ${FFMPEG_LIB_PATH}/lib${ffmpeg_lib_name}.so)
    message("[import so file] => ${FFMPEG_LIB_PATH}/lib${ffmpeg_lib_name}.so")
endforeach ()
在最后将ffmpeg加入链接库就好了
target_link_libraries( # Specifies the target library.
                       surfacework

                       # Links the target library to the log library
                       # included in the NDK.
                       ${log-lib}
                       ${ffmpeg_libs_names} )
5.编写测试的c++代码
(1) 在java层声明native方法
AVUtils.java
package com.qmel.surfacework;
public class AVUtils {
   //导入so文件
    static {
        System.loadLibrary("avformat");
        System.loadLibrary("avcodec");
        System.loadLibrary("avutil");
        System.loadLibrary("swscale");
        System.loadLibrary("swresample");
        System.loadLibrary("avfilter");
        //这是我自己的库,根据自己的项目自行修改
        System.loadLibrary("surfacework");
    }
    //获取所有的编解码
    public static native String getFFmpegCodecList();
}
(2) 在cpp中的实现
surfacework.cpp
#include <jni.h>
#include <cstdlib>
#include "android/log.h"
#include "string.h"

extern "C" {
    #include "libavcodec/avcodec.h"
    #include "libavformat/avformat.h"
    #include "libavfilter/avfilter.h"

    JNIEXPORT jstring JNICALL
    Java_com_qmel_surfacework_AVUtils_getFFmpegCodecList(JNIEnv *env, jclass clazz) {
        // TODO: implement getFFmpegInfo()
        char info[40000] = {0};
        //列举所有的编解码器
        void *p = nullptr;
        const AVCodec *c_temp;
        while ((c_temp = av_codec_iterate(&p))) {
            if (av_codec_is_decoder(c_temp)) {
                sprintf(info, "%sdecode => %s\n", info, c_temp->name);
            } else {
                sprintf(info, "%sencode => %s\n",info, c_temp->name);
            }
        }
        return env->NewStringUTF(info);
    }
}
注意ffmpeg的头文件是在extern "C" 里面声明的,在外面的话会出现undefined reference to 'av_codec_iterate(void**)',无法找到方法之类的信息,具体原因有时间再分析
(3) activity_main.xml
<?xml version="1.0" encoding="utf-8"?>
<androidx.constraintlayout.widget.ConstraintLayout xmlns:android="http://schemas.android.com/apk/res/android"
    android:layout_width="match_parent"
    android:layout_height="match_parent"
    xmlns:app="http://schemas.android.com/apk/res-auto">


    <ScrollView
        android:layout_width="match_parent"
        android:layout_height="match_parent"
        android:fillViewport="true">
        <TextView
            android:layout_margin="16dp"
            android:text="info"
            android:layout_width="match_parent"
            android:layout_height="wrap_content"
            android:textSize="16dp"
            android:id="@+id/tv_info"/>
    </ScrollView>

</androidx.constraintlayout.widget.ConstraintLayout>
(4) MainActivity.java
package com.qmel.surfacework;

import android.os.Bundle;
import android.widget.TextView;
import androidx.annotation.Nullable;
import androidx.appcompat.app.AppCompatActivity;

public class MainActivity extends AppCompatActivity {
    private TextView tvInfo;
    @Override
    protected void onCreate(@Nullable Bundle savedInstanceState) {
        super.onCreate(savedInstanceState);
        setContentView(R.layout.activity_main);
        tvInfo = findViewById(R.id.tv_info);
        tvInfo.setText(AVUtils.getFFmpegCodecList());
    }
}
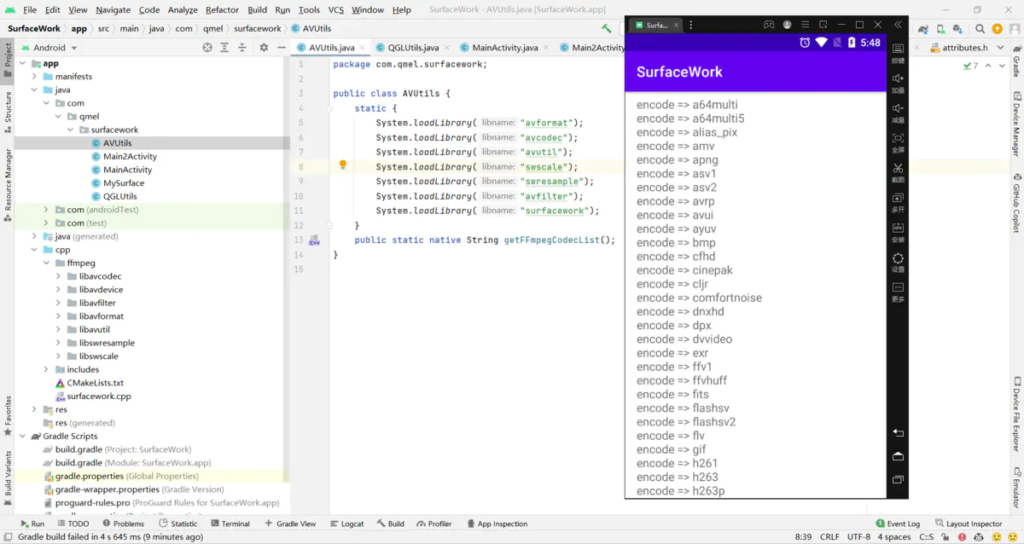
6.运行Android程序结果

程序运行结果
当你的程序运行没有闪退,并且能正确的获取到所有的编解码器信息,说明已经成功导入了!
文章评论